Friday, September 5, 2008

Done!


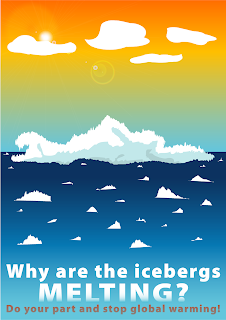
This poster is based on my past assignments which is focused on the area of ice caps melting in the Arctic. Its time we realize that we have to make changes before it’s too late. Global warming is not something new to us. The rising temperature of Earth is causing the extinction of animals, sea levels to raise, forest being wiped out and ice caps in the Arctic to melt.

I created this poster to spark awareness on the observer's eye what is happening to the ice caps due to human activities that causes global warming. My poster also shows
how peaceful and beautiful ice caps in the Artic are but due to high temperature caused by Global warming, we might not have ice caps anymore in the future.

Mainly, I am trying to create an awareness that its about time we stop Global warming together to make sure in the future ice caps are not extinct due to melting of high temperatures.

Tuesday, September 2, 2008

Steps to create my poster

These are the steps for illustrator.

Step 1: First i created a rectangle box for my ocean. I then used the gradient tool to create a mixture of blue colors for the ocean.

Step 2: Next i created another rectangle for my sky. This time i also used the gradient tool to color the skies.

Step 3: For the iceberg, i used the pen tool to draw it. Next i colored it white.

Step 4: Next i used the wrinkle tool to create a melting effect on the ice berg.

Step 5: Now i created smaller melting ice caps with the pen tool and give it a white color.

Step 6: Again, i used the wrinkle tool to create the melting effects on the smaller icecaps.

Step 7: For the sun, i used the flare tool with the setting as above.

Step 8: Next, i used the ellipse tool to create the clouds. First i made a couple of ellipse shapes and place them close to each other. Then i used the path finder tool to join them together.

Step 9: Next i used the warp tool to give it a bubble effects on the clouds.

Step 10: Then i used the text tool to add my poster statement. I used the gradient tool to give the text some color.

Step 11: Next i used the knife tool to slice the iceberg so that i have a split section for the shadow on the ice berg.

Step 12: Then i added a light blue color for the shadow on the iceberg.


Step 13: Finally, I added an awareness statement for my final touch.